Showing posts with label restoration. Show all posts

Tuesday, March 9, 2021

MG TF work

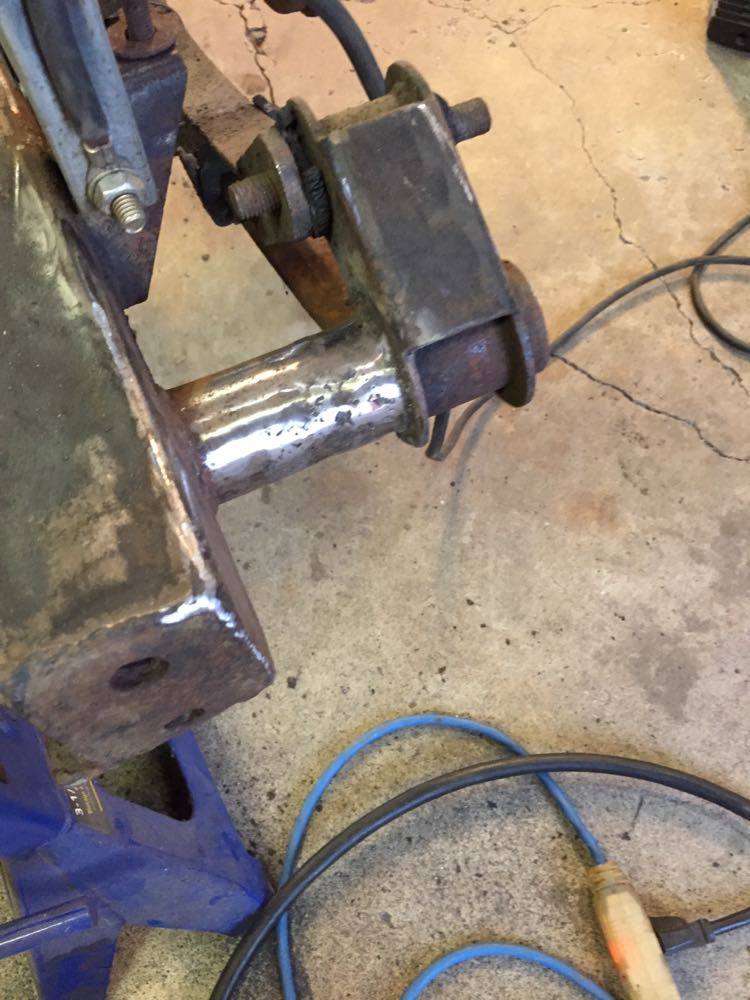
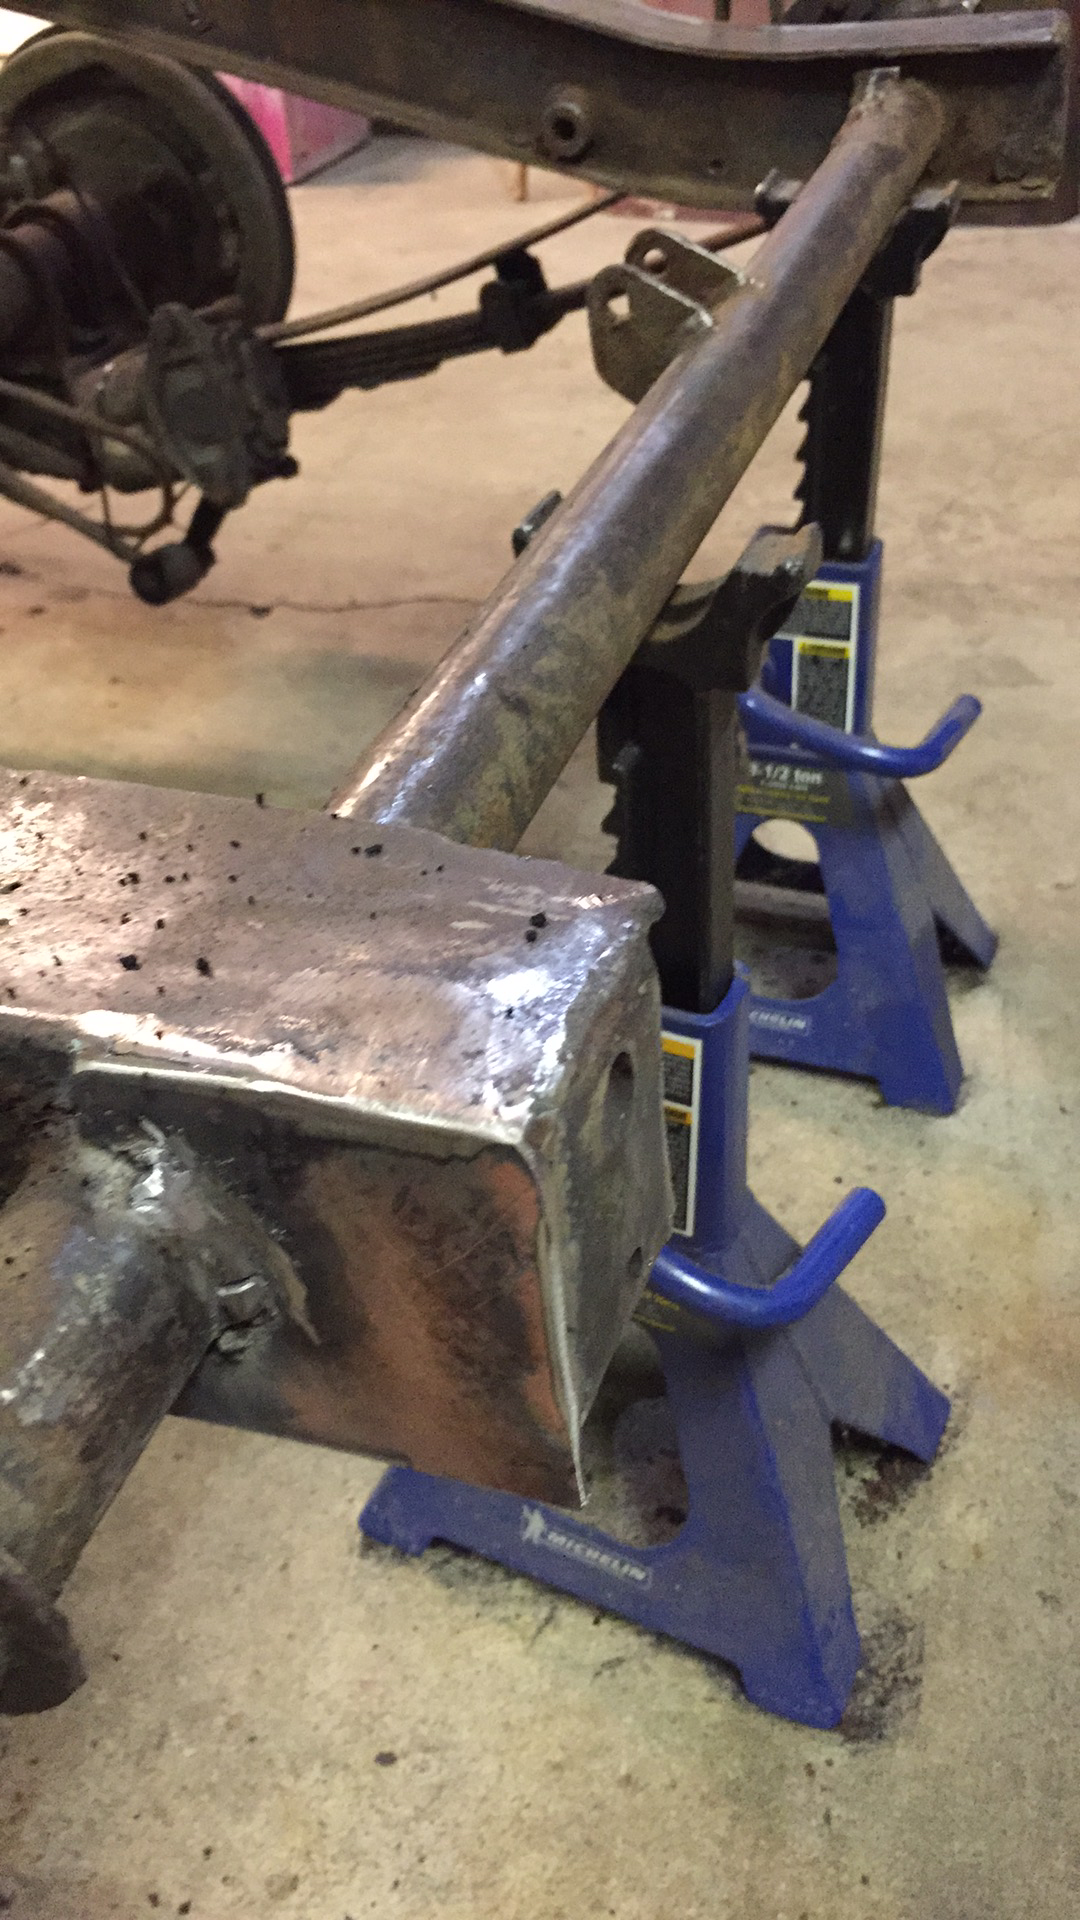
 I will let the photos speak for themselves.  On May 6th, 1954, this once complete car proudly rolled off the assembly line at Abingdon.  She ended up in Canada and was enjoyed for a number of years.  The previous owner bought her in the 1970's.  Somewhere along the line he decided to do a restoration, stripping every nut and bolt and moving some of her vital parts to the basement.  

The owner then became older and his health failed.  In the interim, he had become something of a car farmer and forgot about the TF frame he had left out in a field.

Many years later, his children and grandchildren were tasked with clearing the property.  The grandson was given the TF and a random smattering of other parts as payment for services rendered.  Missing was the gearbox, seats and several other items.  It is likely that many of the components were cherry picked over the years for other projects. 

The grandson had some good intentions for the car, however a cross-country move prevented any progress.  Enter my friend and I.  

I claim very little credit for the incredible work in these photos.  I was performing less important tasks such as cleaning, stripping and priming parts.  This poor frame had most certainly seen much better days;  To my friend's credit, he put a good 30 or so hours into welding, cutting and fabricating new steel to go in.  Most impressive was the replacement of the rotted section below the transmission cross member.  When we picked the car up,  my hand went right through the bottom!   I happened to have some steel pipe of the correct diameter.  One would be hard pressed to look at it now and realize anything had been replaced.  I am blessed to have such good friends.


Until Next time! 


Tuesday, July 7, 2020

Support your local Elder Statesman.....


 Elder Statesman:

noun-

an influential citizen, often a retired high official, whose advice is sought by government leaders.
any influential member of a company, group, etc., whose advice is respected.

About a month ago, I was having a somewhat miserable weekend.  Those of you who work on old bikes and cars will understand immediately.  It was the sort of of day where the best laid plans all unravel; Parts you thought would fit don't fit; that 'I only have one of these left' piece falls from the bench and shatters.  The sort of day that can cause one to lose faith and want to pack it all in. 


The frame had been freshly painted green for this mock up.


I was certainly the author of my own misfortune that day. Lacking a front wheel for the BSA project, I thought I could get away with fitting one from a Triumph Cub.  I found out (naturally) that the wheel spindle was too narrow for the forks.  Then I had a second 'brainwave'.  Take the narrower top and bottom C11 yokes from the big pile and mount the forks and wheel that way.


Perhaps I am being a bit hard on myself as the set up in the photos above looked acceptable.   I spent the day cleaning up the Cub wheel, grinding off rust with a wire wheel and filling pits with metal stick epoxy.  I then sanded everything smoothly, coated with rust paint and went to put on my 'golden boy' Shinko tire.  As a side note, I really like the look of these, I am told they are made from old Yokohama and Pirelli molds. 

Wouldn't you know it, the rim strips I ordered were 21" instead of 19!  Bugger, I thought however it was certainly not 'bugger'  which was said aloud!  I then proceeded to take some fabric tape off the shelf and wrapped it around the rim.  I mounted the tire and tube only to end up with not one, but two punctures.   After some further choice words, the tube was ripped from the tire and thrown in the bin.  I decided to soldier on and attempt to fit the wheel anyway.  I am not sure what prevented me from measuring this mess before I dug in.  Long story short, it was evident that this harebrained scheme would not come to fruition.   I left the garage to ponder my next move, which should have been obvious from the get go.  Call the local BSA man. 

I will admit that I am very hesitant to call up people and ask for parts or guidance.  I have a bad habit of assuming that I'm being a nuisance or that I am infringing on privacy.  The BSA man, who is in his eighties still rides and restores bikes.  When I first visited his garage my jaw nearly hit the floor looking at all of his spectacular builds.   He made a point to tell me that each bike was built from parts and few had matching numbers.  He was quietly proud of his work and rightfully so.  Rivet counters be damned!   He is also a member of my local branch of the vintage group and lives about 15 minutes away.  I called and left him a voicemail which he returned within an hour or so.  He had a correct wheel with decent tire for the paltry sum of $100.00.  

I looked forward to seeing him and much of my anxiety about being something of a bike building failure dissipated when I entered his shop.  I looked around a little and we chatted some.  He had no problem with me looking closely at his lovely '47 B31 and taking mental notes.  I let it slip that I had been having a frustrating time as of late.  Without missing a beat he said 'You've got too much stuff in that garage of yours.  You need to get the bikes on wheels and the rest will follow'.  Simple but sage words.  Not wanting to dither, I took my leave.  The BSA man's words ringing in my ears.  

I spent the next week and weekend purging the garage.  I gave away three tote bins worth of goods and gathered several bags of garbage, recyclables and hazardous waste to go to the local transfer station.  I moved things around and organized.  I swept and bought more little storage shelves for sundries.  I reorganized my solvent shelves and my tools.  I then looked at the 'new' workspace from the driveway in a state of disbelief.  

It was as if I had just moved to a new property, the difference was absolutely staggering.  Since then I have been able to find what I am looking for, I have been able to work and move freely as can the rest of the family.  

Those simple powerful words from the outside were exactly what I needed to hear. 

My advice to any reading this is to cast aside your ego and seek out those elder statesmen.  Listen and learn for you are not a nuisance; you are a torch bearer.  

My deepest thanks to the BSA man, I look forward to meeting with you again. 

Until next time..... 


Monday, July 6, 2020

Matchless update!


Matchless, I have not forgotten thee!


This is the final mock up of the G9 and an idea of how she will look, minus a couple surprise pieces!

My smaller forks and front end were removed and put on my friend's '49 AJS (which is coming along nicely).  Thanks to bike builder extraordinaire Goldy, (as he is known on many bike forums) I now have an excellent pair of conrods for the engine.  I am waiting on an extractor from England in order to replace the main bearings which I have at hand.

Some may note a different tail light and much smaller headlight from earlier configurations; I was playing around and this works much better with the overall look and feel.  By the end, I unconsciously built a 50's California custom street scrambler and I have no complaints!  My friend down the road (and one town over) provided me the alloy Tail light for free.  I installed a NOS Sparto lens I had been saving for a special occasion.  The headlamp (not the one pictured) is an old KD with a 5 3/4 Lucas lens.  The seat was bought for $20.00 on Ebay, and recovered with marine vinyl.  The front mudguard is an AMC item and came with the original haul of parts.  The rear is for a Royal Enfield Bullet.

I ended up sending the single side hubs to the '49 AJS and going with the full width wheels. I was very hesitant to do this originally as I didn't like the look.  They have certainly grown on me since.

I will attempt to document some of the rebuild and provide more detailed photos soon.  Project Covid has lots of updates as well, so stay tuned!

Until next time.......


Thursday, January 23, 2020

Ironing out the niggling details....


In some regards, restoring a bike back to spec is easy.   By easy, I mean having definite guidelines and photographic references to follow.  Hard work?  Absolutely.  Once you have all the right parts however, it can be similar to building a life sized Airfix kit.

Building a custom bike or something from random parts can be much more challenging; Often the smallest victories yield the greatest rewards.

My latest victory was in the form of a tail light.  As trivial as it may sound, I could not find the right tail light/brake light for this build.  This had actually been driving me to distraction for the better part of two years.

I played around with a variety of different styles, finally settling on an original English made Sparto piece that I fabricated a lens for.

Close, but not quite.
It looked good and was very, very close to being right.  It just wan't right enough.

Back to the drawing board.

My criteria was fairly straightforward.  I wanted something that looked period, flowed with the bike and was functional.  I also wanted something unique and lighter than the Sparto unit.   To make life harder, I didn't want a repop item from China or India.  There is a cheapness to these items that always seems to let the side down.

Cruising around on Ebay, I spotted something a little bit different.  It was an NOS Lucas light I had never seen before, a model VT31.  There wasn't much online about it, just that it was used on bicycles and mopeds primarily.  The asking price was low, so I took a chance.

Rather than fabricate a backing plate, I decided to modify something I already had.
The plate is most certainly a DIY item, I have no idea what the off-set drilled holes were for.


The first step was to weld some plate on the back to cover the holes.  I then welded some steel washers into the holes and removed the plate on the back.  Next, I lined up the light in order to drill the mounting holes.


Then a little filler and a bit of paint.

Front 
Side view
I am really happy with the way that this turned out.  It certainly checks all the boxes for me with the added bonus of having lots of character.  Although hard to see in the photos, the light is actually adjustable so I can fine tune when the rear mudguard is in place.

Until next time....


Tuesday, December 3, 2019

Joseph Lucas and the Temple of the lost spark


As mentioned in my previous post,  my mixed-bag '58 suffers from something of an identity crisis.
A 350cc with a 500cc barrel and piston and a half-finished magneto conversion.

After much dithering and back and forth, I ultimately decided to return the bike to stock ignition.

This decision was made due to not having the correct timing covers (mine are AJS branded) and not having the correct magneto.  I do have a Fairbanks Morse FM that gives off spark, however it will need some work to adapt.  Further to this, the FM lacks an advance and retard control.


Finding the correct magneto in decent shape is also a challenge.  They usually range anywhere from $100-300 (and up) and buying one is a something of a gamble.  These units are fifty to seventy years old at this point and inevitably worn out.  A rebuild means several hundred more;  Money well spent for certain, but certainly money I don't have to spare at the moment.   Points and condensers are cheap and plentiful.  I have several NOS Lucas sets sitting in my parts bin ready for use.

I managed to find the correct inlet cam and timing covers on Ebay;  The wiring harness came from feked.com.

As an aside, this will be my last order with Feked;  The company and products are fine, however shipping is horrendous and I am always hit with exorbitant customs fees.  


The missing piece is the Auto Advance unit and plate, known as unit  CA1A in the Lucas catalog.
I figured that being a Lucas unit, it would be easily attainable and very likely used on many different makes/models.  I was incorrect!

If you do a google search or eBay search, almost nothing will come up.  Even the individual components yield no result.   I was able to find out that the CA1A was used on three separate bikes;  The BSA C12, Royal Enfield Clipper and the Matchless/AJS single(s).

I spent countless hours scouring articles and forums, looking for answers or substitute units that could be utilized.   Nothing.

Fortunately for me,  I found a photo reference on Hitchcock's website.  They are the leading provider of all things RE in the world.  I received a prompt reply stating that there are no substitute units that can be used, however they would search for a used set for me.

Considering that the coil ignition singles were on the market for eight years, it's a little surprising there aren't more of these about.   I can only hope that means that many of these bikes live on and are seldom broken up for parts.  That would be a ray of sunshine reaching through a cloud of unobtanium.

Until next time.......


Wednesday, October 16, 2019

Matchless G3 assessment and a rather large surprise!


After playing with the new matchless single for a month, an update and initial assessment is quite overdue!

Let's start with the good.

Unlike almost everything else I have ever bought this bike is 95% complete.  This is a huge help as I want it back together within a few months rather than a few years.  The engine has excellent compression and turns over freely.  This, combined with the other pieces I have accumulated will make this a much less expensive project.

Now the Bad.

When I say 'bad' it really should be taken with a grain of salt.  If I didn't have the aforementioned parts at hand these line items would certainly be a pain.

-The rear wheel.  I am not sure what has been done to the rear wheel,  it turns freely (decent bearings) however the spindle cannot be removed due to rusted on components.  In addition, the wheel is coated in some sort of silver paint (complete with grit) that paint stripper won't remove.  I'll get tough with it later.  For now, I have a spare wheel ready to go.

-Front forks.  The lowers have hairline horizontal fractures.  Looks like someone landed quite hard!
Enter spare set of forks.

-Front Wheel.  Has a bent rim but very good for spares.

-The Frame.  The swing arm was junk, with an agricultural repair.  The bushings were incorrect, forcing me to carefully cut through said bushing to remove it.  I picked up the swing arm from the other '58 frame we acquired and switched it out.

The left side of the frame also had some extensive damage.  I was able to do a primitive but clean enough repair.


The first step was to bend the piece straight with heat and leverage.

The 'open wound' was beyond straightening.  I cut off the excess fold and
found some material to replace it.  I also sandwiched some steel in between to
 strengthen up the piece.  

After the first weld and grind.

Shot from the side.


Shot from the top.


I then cleaned up the frame and brush pained with Chassis black paint, which I had used previously on the VW.  I should have bought semi gloss, but so it goes. 

The painted frame as it sits now. 


I did some massaging to the hind quarter of the frame which was also a bit bent.  I had a set of girlings from the GMH (Great Matchless Haul) of 2016 which were the right size.  The incorrect items were put in the spares pile.  

In my excitement, I went and ordered an exhaust pipe from Walridge.  To my shock, the pipe was far too small.  The little G3 was hiding a big secret.  It had been converted to a 500! 

As far as surprises go, this was a pleasant one.  Fortunately the too small pipe found a home on the AJS and I ordered another.   The other arrived and was about 1/32" too small.  The P/O had done some sort of modification that removed too much surface from the exhaust port.  What to do?  I thought of getting/making and adapter or filling some surface with JB Weld.  Fortunately, I took the head and pipe to a local muffler shop.  Initially reluctant as he thought the pipe would crack, the manager agreed to flare out the end to fit.  After a few attempts it was near a perfect fit.  I could see some stress marks and decided not to push my luck further.  With a good exhaust sealant, all should be fine.   Best of all, I was not charged for the work. 

Eagle-eyed readers may have noticed something else unusual about the engine.  1958 models were originally equipped with a combination of  coil and points ignition and alternator to charge the battery.  The P/O modified the engine to run off of a Magneto while retaining the alternator.  Not the worst idea in the world as one can still run the engine with a flat battery.  

I can either convert to stock with side covers I found on Ebay or use an old Fairbanks Morse magneto to provide spark.  We shall see.  

Coming soon; Wheels, tank, seat and mudguards.

Until Next time! 


Wednesday, August 7, 2019

It's starting to look like a bike......Finally!


It's been a while since I have updated the blog, however I have been very busy behind the scenes!

The biggest development happened this past weekend when I assembled the front end and frame of the Matchless project.  For the first time, it looks like a proper motorcycle.  As each piece gets bolted on, I find myself filled with satisfaction and pride.  I was especially pleased with the way the steering damper came together with existing parts and a cut down spring from the hardware store.  It works very well (on the bench at least) and I look forward to testing it on the road, along with everything else of course.

Without further ado (as Paul and Craig would say) here is how she currently sits.


The seat pan is a recent acquisition, picked up for $20.00 plus shipping from Ebay.  I had built my own as I couldn't find a pre-'55 pan or a used seat anywhere.  I am happy that I did the fabrication, it was a great exercise and the end product fit the frame perfectly.  That being said, it is heavier and as an original is at hand, I will use it.  The later headlight was also bought for very little but required new captive nuts to be welded inside and some paint.

When I assembled the frame, I realized very quickly that I was dealing with a hardware deficit!  Fortunately for me,  Mr. Partridge has most of the required bits and a package is en route.

The engine is on the bench to the left, just on the other side of the headlight.  That should be assembled sometime this month and placed into the rolling frame.

This brings me to a quick note about the wheels.  When I got the bike it came with a full width '55 only rear hub laced to an 18" rim that turned out to be bent.  The front was of the single sided, early variety that I really like the look of.   I sourced an early rear hub and had both early wheels rebuilt with fresh spokes and rims by a local shop.  I attempted to get it done myself, but to no avail.  I am happy that I at least dove in and gave it my best.   Seeing that a professional found these to be a challenge I don't feel too badly!

I have mounted Duro tires to the front and rear as my budget (now tantamount to pocket change) couldn't accommodate the price of new Avon Speedmasters.  Hopefully I can upgrade them in a couple of years.  I have to say, Duro does make a nice looking tire that looks the part on a vintage bike.  I am sure that they are reusing old molds, though I am not sure who from.  I am told that Shinko reuses Yokohama Molds from the early 70's.

In other news, the 1973 Triumph has been sold and is out of the garage.  I bought the bike as a project in 2007, shortly after my sister passed away.  I never 'bonded' with the bike and I would work on it periodically over the years and spent quite a bit of money on the way.  A loss for me but a gain for the new owner who is retired and has lots of time on his hands.  I am very happy it found a new home where it will be appreciated.  As much as I love Triumphs, the OIF bikes just don't do it for me.

Last but not least,  I decided to treat Katie to a fresh chain and sprockets.  I could have held out, as the stock sprockets still looked good, but the chain had seen better days.  I had been taught that it was false economy to not change sprockets with new chain, so I bought a kit from Volar.

I was disappointed that the master link was of the rivet variety, not a clip as I am accustomed to.  My attempt to put on said rivet master link was a failure and my chain gently rolled off the bike two miles from home!   I  ordered two (one for back up) links with the clip, size 525 in order to remedy the issue.  To my surprise, I discovered that Volar pins are thinner than the standard size by .005 mm.  I called the company and placed an order for the correct parts which I expect to have tomorrow.  The young lady I spoke to was very friendly and helpful and shipped for free (to my US address) very quickly.  Hopefully I will be able to ride by Friday.


Until next time.....


Wednesday, July 10, 2019

The best instructional video for tire changing I have ever seen...


Courtesy of Lowbrow customs.  I followed this method to install three tires in an afternoon,  no issues!


Until Next time!
Thursday, May 30, 2019

Matchless Mock ups!


This post is long overdue.

Back when I acquired the Matchless parts lot (Feb of 2016)  I had a steep learning curve to figure out just what I had and what could be done with it.   Part of a G12, part of a G9/Model 20 and lots of miscellanea that I am still sorting through.

Since then I have picked up a plethora of new and used parts to fill in the gaps.

Did I also mention the seized 1949 AJS model 18 bottom end that I picked up at Christmas?

I saw the sad little 500cc single motor under a table at the Paris Rally last summer.  Unfortunately I had to leave and didn't get to talk to Mike Partridge about it.  I never forgot the engine and always wondered what happened to it.  Turns out it has been collecting dust since and he was more than happy to part with it.  I also acquired a lovely sleeved barrel and an iron head.  I had no idea what I was going to do with it of course, but I always admired and wanted a British single.  Even if it was just part of one.   Sometimes I just get that feeling when I see something I like.


I am getting a little ahead of myself.


Here is a sneak peek of the Matchless G9, that will be wrapped in the '55 AJS frame.  The motor, which is in very good shape is on the bench being rebuilt.  New sludge trap screws, Conrod and main bearings have been used in the bottom end.  The top end has been treated to a full rebuild.  New valves, vale guides and springs.   It was my first top end rebuild and I found it to be very rewarding!

My top tip is to have an extendable magnetic wand at hand to help place the collets when the springs are under load.  This also helps you retrieve a collet if you drop one.

The seat frame is homebuilt, based on the plans from Christian's Archive.  I used my spare tank for most of the mock ups (in case it fell).   I really like the look with these bars ($5.00 swap meet find) and this tail light (I have a post coming with the genesis of that home made special).  I will be using the 18" QD rear wheel seen on the truing stand.  That wheel came with the parts lot,  but the rim was badly bent.  I sourced a NOS Hap Jones WM2 18 on Ebay for $20.00 and laced it up.  The chrome mudguard is intended for a Royal Enfield Bullet and fits in perfectly.


With the G9 more or less sorted, I wanted to figure out what to do with the rest.   I brought the G12 stuff from the rafters and assembled it loosely.  I looked over the components and realized that re-building the 650cc engine up would be quite expensive.

The solution?


I decided to pair the '49 motor with the 1960 frame and fittings.  I have to say, it looks very correct, very right.

I foresee something like this, but in AJS trim and colours;  Making it a 'Southerner' apparently.


That is a project that will have to wait a while, but I do love it when a plan comes together.

Until next Time!